This tutorial shows you how to use Firebase Realtime Database service in Flutter.
Firebase Realtime Database is a NoSQL cloud database that allows you to store and synchronize data in realtime. It's integrated with Firebase Authentication, so that you can use declarative security rules for data access. In addition, it also supports offline mode that allows data to be synced later when the device goes online. If you want to use the service in a Flutter application, you can read the explanation and examples in this tutorial.
Integrate Firebase to Flutter Application
Like using other Firebase services, you need to integrate your Firebase account with your Flutter application. Basically, what you need to do is create a Firebase project and add application(s) to the Firebase project. Then, download and copy the config files to your Flutter project. You can read the details in our tutorial about integration with Firebase services in Flutter.
To use Firebase Realtime Database in a Flutter application, you can use the firebase_database package. In addition, you also need to add firebase_core as a dependency. If you want to use Firebase Authentication, which can be used to authenticate and authorize data access, you also need to add firebase_auth as a dependency as well. Add the below dependencies to your pubspec.yaml file and run flutter pub get.
  dependencies:
    firebase_auth: ^1.2.0 # Needed if you want to use Firebase Authentication to restrict data access
    firebase_core: ^1.2.0
    firebase_database: ^6.1.2
Set Up Database
First of all, you need to set up the database from the Firebase Console. Navigate to Build → Realtime Database from the sidebar. If you haven't set up the database, you should see the Create database button.
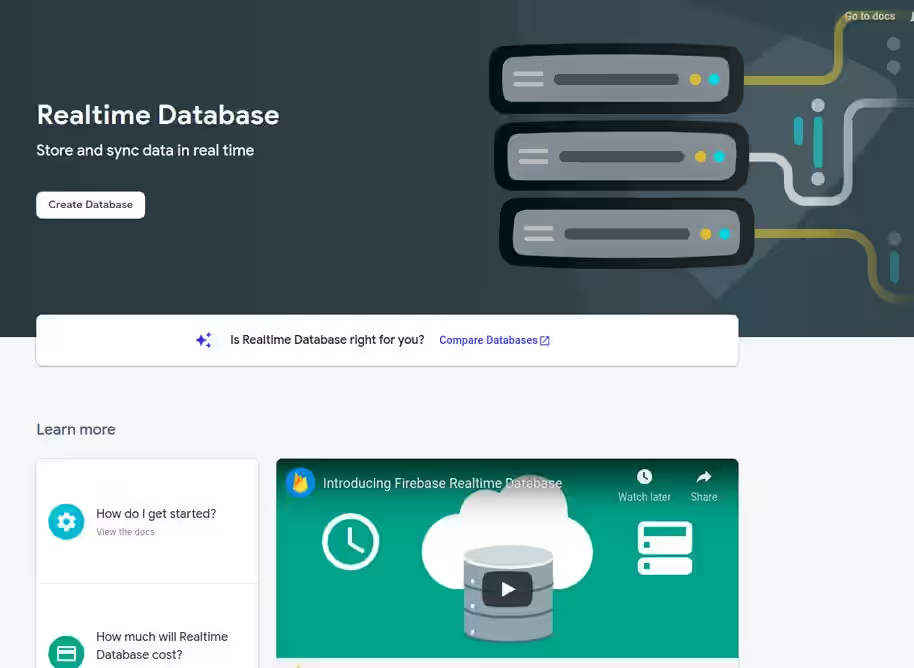
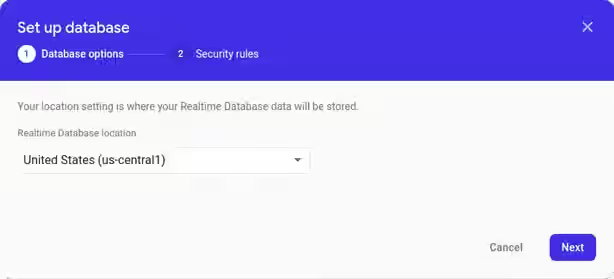
Click the button and you'll see a popup for setting up the database. In the first step, choose the location where the Realtime Database data will be stored using the dropdown.
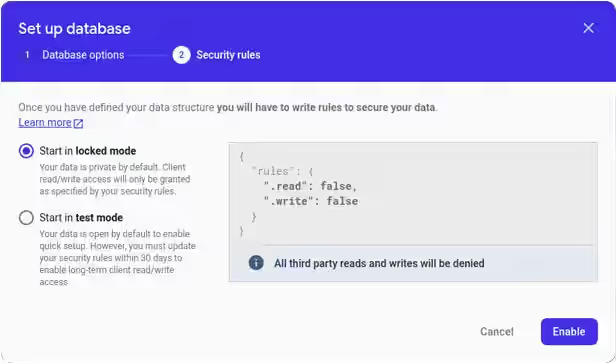
Next, you can choose the initial rules for reading and writing data to the database. Just choose one of the options since you can edit it later. I'm going to explain about rules in the next section.
After that, the database should be successfully created.
Edit Data
Firebase Realtime Database uses JSON as the data structure, with a node as the root. From the Firebase Console, you can edit the data. It's also possible to edit data from a Flutter application which is going to be explained later in this tutorial.
On the Data tab of Firebase Realtime Database, you can edit the JSON data. A JSON node can represent a leaf node or non-leaf node. For adding a leaf node, you can hover the cursor over the parent node and click the + symbol. Then, fill in the name and value fields for the new node.

If the node you want to add has an object as its child, you only need to enter the name field of the node, while the value field should be left empty. Then, click the + symbol on the new object node for adding each field of the object.
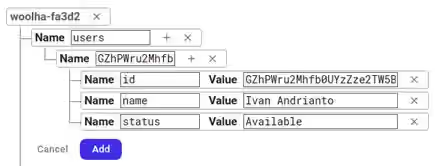
If the node you want to add represents an array, you only need to enter the name field of the node, while the value field should be left empty. For each array element, you need to click the + symbol on the new node. The value field should be field with the array element, while the name field should be filled with the array index.

Set Rules
In some cases, you may want to authorize that only certain users can perform read or write data on a node. If you go to Rules tab, you should see a configuration in JSON format. The configuration can be used to add authentication and authorization rules, so that you can control who can access the data. In addition, you can also add validations and indexes. There is also a form that can be used for simulating read, set, and update operations based on the current rules.
There are some rule types that you can use:
.read: Whether the data is allowed to be read..write: Whether the data is allowed to be written..validate: Validation rule for the value..indexOn: Specifies the children to be indexed for ordering and querying.
To define a rule type, you need to add the rule type as a field in the configuration JSON. The JSON has hierarchical structure. The root's name must be rules. A rule type defined as the direct child of the root applies to all children. But you can also specify rules only for a specific path. For example, we have a data structure as shown below.
  {
    "applicationName": "woolha",
    "users": {
      "user01": {
        "id": "user01",
        "name": "Ivan Andrianto",
        "status": "Available"
      },
      "user02": {
        "id": "user02",
        "name": "Joko",,
        "status": "Unavailable"
      }
    },
    "categories": ["Category One", "Category Two"],
  }
And the following rules.
  {
    "rules": {
      ".read": true,
      "users": {
        "$uid": {
          ".write": true
        }
      }
    }
  }
Using the rules above, it means read operations are permitted for all children. There is also a specific rule which allows writing data on nodes whose path is users/{$uid}.
Authentication
You may want to limit only authenticated users are allowed to access the database. For authentication, you can utilize the Firebase Authentication. Therefore, in order to access the database, a user must be registered or signed in first. The Firebase Authentication supports some Authentication methods including anonymous, email and password, Facebook, and Google. I'm not going to explain Firebase Authentication deeply in this tutorial. But once a user is authenticated, the auth value (which is a special variable in rules) is not empty. Let's say you want to limit that all data can only be read by authenticated users only. It can be achieved by passing .read field whose value is "auth !== null".
  {
    "rules": {
      ".read": "auth !== null"
    }
  }
You can do the similar thing to apply .write rules. Understanding how Firebase applies the .read and .write is a bit tricky. If there are multiple .read or .write rules applied to a path, Firebase will evaluate the rules one by one from the outermost to the innermost. It will stop if a rule evaluates to true. With the below rules, read operation is allowed for users/${uid} path because the .read rule on line 3 evaluates to true.
  {
    "rules": {
      ".read": true,
      "users": {
        "$uid": {
          ".read": false
        }
      }
    }
  }
Read operation for users/${uid} path is also allowed using the below rules since the .read rule on line 6 evaluates to true.
  {
    "rules": {
      ".read": false,
      "users": {
        "$uid": {
          ".read": true
        }
      }
    }
  }
Authorization
Sometimes, it's necessary to restrict that a user can only write or update his own data. For example, using the data structure above, a user can only modify the data in users/{$uid} if the data represents the user, but not allowed to modify another user's data. If the user is authenticated using Firebase Authentication, the auth object will not be null. The auth object contains a property uid which is the Firebase Authentication ID for the user. Therefore, it would be easier to use the uid as the key.
  {
    "applicationName": "woolha",
    "users": {
      "GZhPWru2Mhfb0UYzZze2TW5B7hA3": {
        "id": "GZhPWru2Mhfb0UYzZze2TW5B7hA3",
        "name": "Ivan Andrianto",
        "status": "Available"
      },
      "M0SdljwvQTSjBAFj7DEMo91DWg52": {
        "id": "GZhPWru2Mhfb0UYzZze2TW5B7hA3",
        "name": "Joko",,
        "status": "Unavailable"
      }
    },
    "categories": ["Category One", "Category Two"],
  }
By using Firebase Authentication IDs as the keys, it's possible to use "$uid === auth.uid" to determine whether the operation is allowed.
  {
    "rules": {
      ".read": "auth !== null"
      "users": {
        "$uid": {
          ".write": "$uid === auth.uid"
        }
      }
    }
  }
Validation
For data consistency, you can also add validation before the data is updated by adding .validate rule. Unlike the .read and .write rules, if there are multiple .validate rules for a path, all must evaluate to true in order for the write to be allowed. The below example adds validation for the name field of objects in users/${uid}.
  {
    "rules": {
      "users": {
        "$uid": {
          ".read": "$uid === auth.uid",
          ".write": "$uid === auth.uid",
          "name": {
            ".validate": "newData.isString() && newData.val().length < 50"
          }
       }
      }
    }
  }
Index
As Firebase Realtime Database allows you to query and order the data, it can be important to specify indexes for fields that you use for filtering or ordering, especially if the data can be very big. You can use .indexOn rule to specify the children to be indexed.
  {
    "rules": {
      "users": {
        "$uid": {
          ".indexOn": ["name"]
        }
      }
    }
  }
Using Firebase Realtime Database in Flutter
After you have integrated Firebase to your Flutter application and adding firebase_database as a dependency, you should be able to use Firebase Realtime Database by adding the import below.
import 'package:firebase_database/firebase_database.dart';In order to perform data operations, you need to get the DatabaseReference object, which refers to a particular location (node) in the database. The DatabaseReference itself can be obtained from an instance of FirebaseDatabase. Therefore, you need to create the FirebaseDatabase instance first, using the constructor below.
FirebaseDatabase({FirebaseApp app, String databaseURL})The constructor has two arguments: app and databaseURL. The databaseURL argument should be passed if the app argument is passed. You can obtain the database URL from the Data tab of Firebase Realtime Database page in the Firebase Console. In order to get the FirebaseApp, first you need to import firebase_core
import 'package:firebase_core/firebase_core.dart';Then, you can call await Firebase.initializeApp() to get the FirebaseApp instance.
Since this tutorial is a bit complex, the code will be separated into multiple files. In this tutorial, we are going to save user data to the database. Below is the model that represents the user data.
models/user_data.dart
  class UserData {
    UserData({
      this.id,
      this.name,
      this.status,
    });

    String id;
    String name;
    String status;

    Map<String, Object> toMap() {
      return {
        'id': id,
        'name': name,
        'status': status,
      };
    }

    static UserData fromMap(Map value) {
      if (value == null) {
        return null;
      }

      return UserData(
        id: value['id'],
        name: value['name'],
        status: value['status'],
      );
    }

    @override
    String toString() {
      return ('{id: $id, name: $name, status: $status}');
    }
  }
The FirebaseApp needs to be initialized when the application starts. Besides for creating the FirebaseDatabase instance, it's also necessary for FirebaseAuth. Below is the main entry-point file which initializes the FirebaseApp. It uses FutureBuilder, so that the other widgets are created after the FirebaseApp has been initialized.
screens/main.dart
  import 'package:firebase_core/firebase_core.dart';
  import 'package:flutter/material.dart';

  import 'auth_form.dart';
  import 'data_form.dart';

  void main() => runApp(MyApp());

  class MyApp extends StatelessWidget {

    @override
    Widget build(BuildContext context) {
      return MaterialApp(
        title: 'Woolha.com Flutter Tutorial',
        home: Main(),
        debugShowCheckedModeBanner: false,
      );
    }
  }

  class Main extends StatelessWidget {

    Future<FirebaseApp> _initFirebaseApp() async {
      return await Firebase.initializeApp();
    }

    @override
    Widget build(BuildContext context) {
      return Scaffold(
        appBar: AppBar(
          title: const Text('Woolha.com Flutter Tutorial'),
        ),
        body: SingleChildScrollView(
          child: Padding(
            padding: EdgeInsets.all(10.0),
            child: FutureBuilder(
              future: _initFirebaseApp(),
              builder: (
                BuildContext context,
                AsyncSnapshot<FirebaseApp> firebaseAppSnapshot,
              ) {
                if (firebaseAppSnapshot.hasData) {
                  return Column(
                    children: [
                      AuthForm(),
                      DataForm(firebaseApp: firebaseAppSnapshot.data),
                    ],
                  );
                } else if (firebaseAppSnapshot.hasError) {
                  return Text('Error');
                } else {
                  return CircularProgressIndicator();
                }
              },
            ),
          ),
        ),
      );
    }
  }
Below is a service class that handles calls and data synchronization with Firebase Realtime Database service. The constructor takes an argument of type FirebaseApp. It creates an instance of FirebaseDatabase by passing the app and databaseURL arguments. Having created the FirebaseDatabase instance, you can call its reference method to get the DatabaseReference. Later, we are going to add some methods in this class which perform various operations such as get, set, or remove data.
services/firebase_realtime_data_service.dart
  class FirebaseRealtimeDataService {

    DatabaseReference _db;

    FirebaseRealtimeDataService(FirebaseApp firebaseApp) {
      _db = FirebaseDatabase(
        app: firebaseApp,
        databaseURL: 'https://woolha-fa3d2.firebaseio.com'
      ).reference();
    }

    // put the methods here
  }
Get DatabaseReference for a Location
The DatabaseReference object represents a particular location (node) on the database. Before performing other operations, you need to know how to get the DatabaseReference for a particular location. If you know the location path, you can use the child method and pass the path as the argument.
DatabaseReference child(String path)The example below returns a DatabaseReference for the node whose location is users/GZhPWru2Mhfb0UYzZze2TW5B7hA3.
_db.child('users/GZhPWru2Mhfb0UYzZze2TW5B7hA3')To navigate to the parent location, you can use the parent method.
DatabaseReference parent()The example below returns a DatabaseReference for the node whose location is /users.
  _db.child('users/GZhPWru2Mhfb0UYzZze2TW5B7hA3')
    .parent()
You can go to the root by using the root method.
DatabaseReference root()Example:
  _db.child('users/GZhPWru2Mhfb0UYzZze2TW5B7hA3')
    .root()
DatabaseReference has some methods that can be used to perform various operations as shown below.
Set Data
The set method can be used to write value to a location with optional priority. If the node location doesn't exist, it will be created. If the location already exists, it will overwrite the old data including all child locations. If the passed value is null, the node will be removed. The supported data types are String, boolean, int, double, Map, and List.
Future<void> set(dynamic value, {dynamic priority})Example:
  Future<void> setUserData(String userId, String name, String status, double priority) async {
    final UserData userData = UserData(id: userId, name: name, status: status);
    await _db.child('users/$userId')
        .set(userData.toMap(), priority: priority);
  }
When the user perform a write operation while the device is offline, the request will be retried later when the device is online. It's already handled by the firebase_database package, so that you don't need to manually handle it.
Update Data
The update method can be used to update the node with the given value. Unlike set, it doesn't overwrite the location and its children. You cannot pass null value as well.
Future<void> update(Map<String, dynamic> value)Example:
  Future<void> updateUserData(String userId, String name, String status) async {
    final UserData userData = UserData(id: userId, name: name, status: status);
    await _db.child('users/$userId')
        .update(userData.toMap());
  }
Push Data
The push method can be used to generate a new child location using a unique key. It returns a DatabaseReference to the new location, which can be used to set the value at the new location.
DatabaseReference push()Example:
  Future<void> pushUserData(String userId, String name, String status) async {
    final UserData userData = UserData(id: userId, name: name, status: status);
    await _db.child('users/$userId')
        .push()
        .set(userData.toMap());
  }
Remove Data
The remove method can be used to remove data at a location along with its children.
Future<void> remove()Example:
  Future<void> removeUserData(String userId) async {
    await _db.child('users/$userId')
        .remove();
  }
Set Priority
To set the priority of the data at a location, you can use the setPriority method.
Future<void> setPriority(dynamic priority)Example:
  Future<void> setPriority(String userId, double priority) async {
    await _db.child('users/$userId')
        .setPriority(priority);
  }
Get Data
To listen for a single value event and then stop listening, you can use the once method. The return value is DataSnapshot, from which you can get the key and value properties. The type of the value property is dynamic. It depends on the retrieved data. For example, the type can be a _InternalLinkedHashMap if the value is an object, a List<dynamic> if the value is an array, or primitive types. If you are not sure what the type is, you can get the type by accessing the value's runtimeType property.
Future<DataSnapshot> once()Example:
  Future<UserData> getUserData(String userId) async {
    return await _db.child('users/$userId')
        .once()
        .then((result) {
      final LinkedHashMap value = result.value;
      return UserData.fromMap(value);
    });
  }
Order by Priority
To get the data ordered by priority, you can use Query's orderByPriority method.
Query orderByPriority()For all kinds of ordered queries, be careful not to use DataSnapshot's value to get the ordered result. That's because the value is already converted to a Map. Instead, you can use onChildAdded, which will be called every time a new child is added, and add the result to a List. The same approach should be used for other orderBy.... methods too.
  Future<List<UserData>> getUsersOrderByPriority() async {
    final List<UserData> orderedResult = [];
    final Query query = _db.child('users')
        .orderByPriority();

    query.onChildAdded.forEach((event) {
      orderedResult.add(UserData.fromMap(event.snapshot.value));
    });

    return await query.once()
        .then((ignored) => orderedResult);
  }
Order by Key
To get the data ordered by key, you can use Query's orderByKey method.
Query orderByKey()Example:
  Future<List<UserData>> getUsersOrderByKey() async {
    final List<UserData> orderedResult = [];
    final Query query = _db.child('users')
        .orderByKey();

    query.onChildAdded.forEach((event) {
      orderedResult.add(UserData.fromMap(event.snapshot.value));
    });

    return await query.once()
        .then((ignored) => orderedResult);
  }
Order by Value
To get the data ordered by value, you can use Query's orderByValue method.
Query orderByValue()Example:
  Future<List<UserData>> getUsersOrderByValue() async {
    final List<UserData> orderedResult = [];
    final Query query = _db.child('users')
        .orderByValue();

    query.onChildAdded.forEach((event) {
      orderedResult.add(UserData.fromMap(event.snapshot.value));
    });

    return await query.once()
        .then((ignored) => orderedResult);
  }
Order by Child
To get the data ordered by a child's key, you can use Query's orderByChild method.
Query orderByChild(String key)Example:
  Future<List<UserData>> getUsersOrderByChildName() async {
    final List<UserData> orderedResult = [];
    final Query query = _db.child('users')
        .orderByChild('name');

    query.onChildAdded.forEach((event) {
      orderedResult.add(UserData.fromMap(event.snapshot.value));
    });

    return await query.once()
        .then((ignored) => orderedResult);
  }
Handle Pagination
If there is a lot of data, perhaps it's better to use pagination and limit the query result so that the returned data is not too big. To get the first n results, you can use Query's limitToFirst method.
Query limitToFirst(int limit)For example, you can change the queries above to call limitToFirst method.
 final Query query = _db.child('users')
      .limitToFirst(100)
      .orderByPriority();
The opposite, if you want to get the last n results, you can use Query's limitToFirst method.
Query limitToLast(int limit)Example.
 final Query query = _db.child('users')
      .limitToLast(100)
      .orderByPriority();
For fetching the data on the next page, the data already fetched before should not be fetched again. You can use Query's startAt method, which returns only child nodes whose value is greater than or equal to the given value. The passed value's must be a String, bool, double, or int. If the data to be fetched is a list of key-value pairs of a JSON object, you need to use one of the keys as the value.
Query startAt(dynamic value, {String key})Example:
  final Query query = _db.child('users')
      .limitToLast(100)
      .startAt('GZhPWru2Mhfb0UYzZze2TW5B7hA3')
      .orderByPriority();
The opposite, you can use Query's endAt method, which returns only child nodes whose value is less than or equal to the given value. Example:
  final Query query = _db.child('users')
      .limitToLast(100)
      .endAt('GZhPWru2Mhfb0UYzZze2TW5B7hA3')
      .orderByPriority();
Another Query's method you may need to know is equalTo, which returns only child nodes whose value is equal to the given value.
Query equalTo(dynamic value, {String key})Example:
  final Query query = _db.child('users')
      .limitToLast(100)
      .equalTo('GZhPWru2Mhfb0UYzZze2TW5B7hA3')
      .orderByPriority();
Handle Data Synchronization
One of the advantages of using Firebase Realtime Database is its ability to handle data synchronization. You can add a listener that will be called every time the data on a particular location changes, either changed by another user or changed from the Firebase Console. The Query class has some methods to use.
Stream<Event> get onChildAdded: called every time a child is added.Stream<Event> get onChildRemoved: called every time a child is removed.Stream<Event> get onChildChanged: called every time a child is changed.Stream<Event> get onChildMoved: called every time a child is moved.Stream<Event> get onValue: called every time the data at the location is updated.
Below is a usage example for onChildChanged. After you get the Query object, you can add onChildChanged in the chain, which returns Event<Stream>. After that, you can process the received Events and do anything that you want. In this example, we call a callback function passed from another class, so that the class that uses the service can determine what to do when the data changes. The usage of the other methods is similar, so I'm not going to give examples one by one for each method.
  _userDetailChangedEvent = _db.child('users/GZhPWru2Mhfb0UYzZze2TW5B7hA3')
      .onChildChanged
      .map((event) => event.snapshot)
      .toList()
      .then((dataSnapshots) {
        _userDetailChangedCallback(dataSnapshots);
      });
Handle Authentication
Firebase Authentication is quite common to use for Firebase Realtime Database. As I have written above, it can be used to control that a particular data can only be accessed by authenticated or authorized users. In your Flutter application, you need to make the user authenticated. There are some authentication methods. In this tutorial, I am not going to explain about authentication in detail. For example, we are going to use email and password authentication method. But if you want to use other authentication method, the concept should be the same.
To use Firebase Authentication in Flutter, you can use the firebase_auth plugin. You need to add it in the dependency and run flutter pub get.
  dependencies:
    firebase_auth: ^1.2.0
After that, you can import it in the file where you want to use it.
import 'package:firebase_auth/firebase_auth.dart';First, you need to initialize FirebaseApp. In this tutorial, it's already done in the MainState class. After that, you need to get the instance of FirebaseAuth. It can be obtained by using FirebaseAuth.instance, which returns an instance using the default FirebaseApp. After getting the instance of FirebaseAuth, for authentication with email and password, the methods you need to call are createUserWithEmailAndPassword (register) and signInWithEmailAndPassword (sign in). After the user successfully registered or logged in, the requests to Firebase Realtime Database will also be authenticated too. Therefore, you can use the auth variable to define the rules. Below is a service that uses FirebaseAuthentication's email and password authentication method.
services/firebase_auth_service.dart
  import 'package:firebase_auth/firebase_auth.dart';

  class FirebaseAuthService {

    FirebaseAuth _firebaseAuth;

    FirebaseAuthService() {
      _firebaseAuth = FirebaseAuth.instance;

      FirebaseAuth.instance
          .authStateChanges()
          .listen((User user) {
        if (user == null) {
          print('User is currently signed out!');
        } else {
          print('User ${user.uid} is signed in!');
        }
      });
    }

    Future<String> authenticateUser({ String email, String password, bool isNewUser }) async {
      try {
        UserCredential userCredential;

        if (isNewUser) {
          userCredential = await _firebaseAuth.createUserWithEmailAndPassword(
            email: email,
            password: password,
          );
        } else {
          userCredential = await _firebaseAuth.signInWithEmailAndPassword(
            email: email,
            password: password,
          );
        }

        return userCredential.user.uid;
      } catch (e) {
        print(e);

        return null;
      }
    }
  }
And below is a simple form for sign in or register that uses the service above.
screens/auth_form.dart
  import 'package:flutter/material.dart';
  import 'package:fluttersimpleapp/firebase_realtime_database/services/firebase_auth_service.dart';

  class AuthForm extends StatefulWidget {

    @override
    _AuthFormState createState() => _AuthFormState();
  }

  class _AuthFormState extends State<AuthForm> {

    final GlobalKey _formKey = GlobalKey<FormState>();
    final TextEditingController _email = TextEditingController();
    final TextEditingController _password = TextEditingController();
    final FirebaseAuthService _firebaseAuthService = new FirebaseAuthService();

    @override
    Widget build(BuildContext context) {
      return Form(
        key: _formKey,
        child: Column(
          crossAxisAlignment: CrossAxisAlignment.start,
          children: [
            TextFormField(
              key: Key('email'),
              controller: _email,
              decoration: InputDecoration(
                  labelText: 'Email'
              ),
            ),
            TextFormField(
              key: Key('password'),
              controller: _password,
              keyboardType: TextInputType.visiblePassword,
              decoration: InputDecoration(
                  labelText: 'Password'
              ),
            ),
            Row(
              children: [
                Expanded(
                  flex: 1,
                  child: OutlinedButton(
                    child: Text('Register'),
                    onPressed: () async {
                      await _firebaseAuthService.register(
                        _email.value.text,
                        _password.value.text,
                      );
                    },
                  ),
                ),
                SizedBox(width: 10),
                Expanded(
                  flex: 1,
                  child: OutlinedButton(
                    child: Text('Sign In'),
                    onPressed: () async {
                      await _firebaseAuthService.signIn(
                        _email.value.text,
                        _password.value.text,
                      );
                    },
                  ),
                )
              ],
            ),
          ],
        ),
      );
    }
  }
Create Form
Below is a form that makes use of the FirebaseRealtimeDatabaseService class above. You can try the operations above using this form.
screens/data_form.dart
  import 'package:firebase_core/firebase_core.dart';
  import 'package:flutter/material.dart';
  import 'package:fluttersimpleapp/firebase_realtime_database/models/user_data.dart';
  import 'package:fluttersimpleapp/firebase_realtime_database/services/firebase_realtime_database_service.dart';

  class DataForm extends StatefulWidget {

    final FirebaseApp firebaseApp;

    DataForm({Key key, @required this.firebaseApp}) : super(key: key);

    @override
    _DataFormState createState() => _DataFormState(this.firebaseApp);
  }

  class _DataFormState extends State<DataForm> {

    static final List<String> _operations = [
      'setUserData',
      'updateUserData',
      'pushUserData',
      'setPriority',
      'removeUserData',
      'getUserData',
      'getUsersOrderByPriority',
      'getUsersOrderByKey',
      'getUsersOrderByValue',
      'getUsersOrderByChildName',
    ];

    final GlobalKey _dataFormKey = GlobalKey<FormState>();
    final TextEditingController _id = TextEditingController();
    final TextEditingController _name = TextEditingController();
    final TextEditingController _priority = TextEditingController();
    final TextEditingController _startAt = TextEditingController();
    final TextEditingController _status = TextEditingController();

    String _operation = 'setUserData';
    String _result = '';
    FirebaseRealtimeDatabaseService _realtimeDatabaseService;

    _DataFormState(FirebaseApp firebaseApp) {
      _realtimeDatabaseService = FirebaseRealtimeDatabaseService(
        firebaseApp: firebaseApp,
      );
    }

    Future<void> _handleSetUserData() async {
      await _realtimeDatabaseService.setUserData(
        _id.value.text,
        _name.value.text,
        _status.value.text,
        double.parse(_priority.value.text),
      );

      _result = 'Set data success.';
    }

    Future<void> _handleUpdateUserData() async {
      await _realtimeDatabaseService.updateUserData(
        _id.value.text,
        _name.value.text,
        _status.value.text,
      );

      _result = 'Update data success.';
    }

    Future<void> _handlePushUserData() async {
      await _realtimeDatabaseService.pushUserData(
        _id.value.text,
        _name.value.text,
        _status.value.text,
      );

      _result = 'Push data success.';
    }

    Future<void> _handleSetPriority() async {
      await _realtimeDatabaseService.setPriority(
        _id.value.text,
        double.parse(_priority.value.text),
      );

      _result = 'Update data success.';
    }

    Future<void> _handleRemoveUserData() async {
      await _realtimeDatabaseService.removeUserData(_id.value.text);

      _result = 'Remove data success.';
    }

    Future<void> _handleGetUserData() async {
      final UserData userData = await _realtimeDatabaseService.getUserData(_id.value.text);

      _result = userData.toString();
    }

    Future<void> _handleGetUsersOrderByPriority({ String startAt }) async {
      final List<UserData> users = await _realtimeDatabaseService
          .getUsersOrderByPriority(startAt: startAt);

      _result = users.toString();
    }

    Future<void> _handleGetUsersOrderByKey({ String startAt }) async {
      final List<UserData> users = await _realtimeDatabaseService
          .getUsersOrderByKey(startAt: startAt);

      _result = users.toString();
    }

    Future<void> _handleGetUsersOrderByValue({ String startAt }) async {
      final List<UserData> users = await _realtimeDatabaseService
          .getUsersOrderByValue(startAt: startAt);

      _result = users.toString();
    }

    Future<void> _handleGetUsersOrderByChildName({ String startAt }) async {
      final List<UserData> users = await _realtimeDatabaseService
          .getUsersOrderByChildName(startAt: startAt);

      _result = users.toString();
    }

    Future<void> _handleSubmit() async {
      try {
        switch (_operation) {
          case 'setUserData':
            await _handleSetUserData();
            break;
          case 'updateUserData':
            await _handleUpdateUserData();
            break;
          case 'pushUserData':
            await _handlePushUserData();
            break;
          case 'setPriority':
            await _handleSetPriority();
            break;
          case 'removeUserData':
            await _handleRemoveUserData();
            break;
          case 'getUserData':
            await _handleGetUserData();
            break;
          case 'getUsersOrderByPriority':
            await _handleGetUsersOrderByPriority(startAt: _startAt.text);
            break;
          case 'getUsersOrderByKey':
            await _handleGetUsersOrderByKey(startAt: _startAt.text);
            break;
          case 'getUsersOrderByValue':
            await _handleGetUsersOrderByValue(startAt: _startAt.text);
            break;
          case 'getUsersOrderByChildName':
            await _handleGetUsersOrderByChildName(startAt: _startAt.text);
            break;
        }
      } catch (e) {
        _result = 'Error: ${e.toString()}.';
      }

      setState(() {});
    }

    @override
    Widget build(BuildContext context) {
      return Form(
        key: _dataFormKey,
        child: Column(
          crossAxisAlignment: CrossAxisAlignment.start,
          children: [
            DropdownButton<String>(
              items: _operations.map((String value) {
                return new DropdownMenuItem<String>(
                  value: value,
                  child: new Text(value),
                );
              }).toList(),
              value: _operation,
              onChanged: (operation) {
                setState(() { _operation = operation; });
              },
            ),
            Visibility(
              visible: <String>['setUserData', 'updateUserData', 'removeUserData', 'setPriority']
                  .contains(_operation),
              child: TextFormField(
                key: Key('id'),
                controller: _id,
                decoration: InputDecoration(labelText: 'ID'),
              ),
            ),
            Visibility(
              visible: <String>['setUserData', 'updateUserData'].contains(_operation),
              child: TextFormField(
                key: Key('name'),
                controller: _name,
                decoration: InputDecoration(labelText: 'Name'),
              ),
            ),
            Visibility(
              visible: <String>['setUserData', 'updateUserData'].contains(_operation),
              child: TextFormField(
                key: Key('status'),
                controller: _status,
                decoration: InputDecoration(labelText: 'Status'),
              ),
            ),
            Visibility(
              visible: <String>['setUserData', 'setPriority'].contains(_operation),
              child: TextFormField(
                key: Key('priority'),
                controller: _priority,
                decoration: InputDecoration(labelText: 'Priority'),
              ),
            ),
            Visibility(
              visible: <String>[
                'getUsersOrderByPriority',
                'getUsersOrderByKey',
                'getUsersOrderByValue',
                'getUsersOrderByChildName',
              ].contains(_operation),
              child: TextFormField(
                key: Key('startAt'),
                controller: _startAt,
                decoration: InputDecoration(labelText: 'Start At'),
              ),
            ),
            OutlinedButton(
              child: Text('Submit'),
              onPressed: _handleSubmit,
            ),
            Text(_result),
          ],
        ),
      );
    }
  }
Full Code
For this tutorial, the code can be downloaded here.
Summary
To use Firebase Realtime Database, first you need to connect your Firebase account with your Flutter application. After that, you can set up the database from the Firebase Console and modify the rules. To access Firebase Realtime Database from a Flutter application, you can use the firebase_database package. It already provides the main functionalities such as write, remove, and get data as well as data synchronization and offline mode support. If you need to authenticate and authorize data access, you can utilize the Firebase Authentication.
You can also read our tutorials about:
